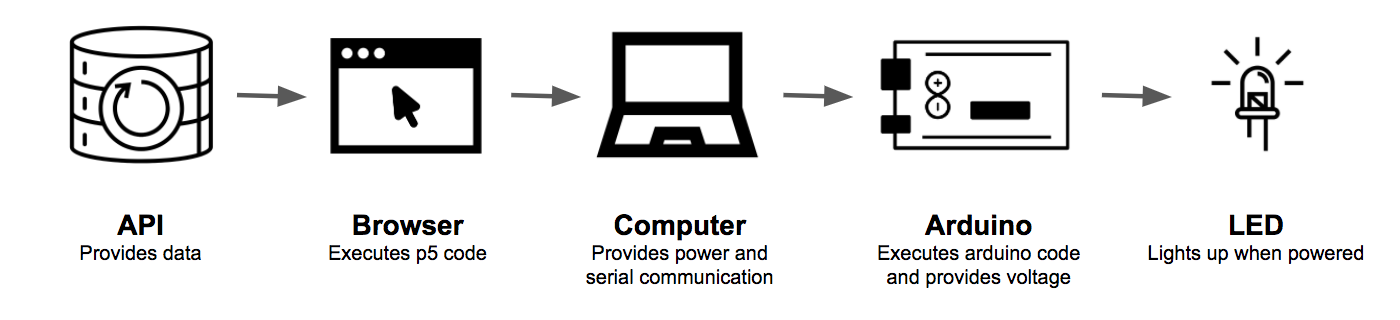
The simple joy of making one single LED light turn on returns this week with the first step towards linking the IRL, moving, ever-changing internet to an Arduino.
Using serial communication and an API call, the green and red lights indicate if the price of Ethereum – a popular cryptocurrency – has gone up or down in the past hour, as per Coin Markets Cap.
What is more, this light shines with different intensity depending on the degree to which the price has changed (i.e. bigger increase = brighter green light).
The red box you see on the screen is a visual confirmation that the API call is working correctly. For example, in this case, the price has fallen in the past hour. if the price had risen in the past hour, both the box and the green LED would be on.

This was done using Arduino and p5 (JavaScript) code, taking advantage of the p5.serial port by Shawn Van Every.
This version relies heavily on the computer for its outcome – the computer provides the link to the internet/web browser, the serial commands, and the power for the Arduino.
In future versions I hope to remove as much of the physical presence of the computer as possible, starting with power and then moving to internet independence, such that the Arduino and lights could stand alone.
Here is the p5 code for this version – its not going to work unless you have the rest of it set up as well, with the following Arduino code, written based on the ITP serial output lab:
const int redLedPin = 11; // the pin that the LED is attached to

const int greenLedPin = 3; // the pin that the LED is attached to

int incomingByte; // a variable to read incoming serial data into
void setup() {

Serial.begin(9600); // initialize serial communication

pinMode(redLedPin, OUTPUT); // initialize the greed LED pin as an output

pinMode(greenLedPin, OUTPUT); // initialize the greed LED pin as an output

}
void loop() {

if (Serial.available() > 0) { // see if there's incoming serial data

incomingByte = Serial.read(); // read it

Serial.println(incomingByte);

if (incomingByte > 128) { // if it's a positive number

analogWrite(greenLedPin, incomingByte); // turn on the green LED by the amount of increase

} else {analogWrite(greenLedPin, 0);};

if (incomingByte < 128) { // if it's an negative number

analogWrite(redLedPin, incomingByte); // turn on the red LED by the amount of increase

} else {analogWrite(redLedPin, 0);};}
3 replies on “From API to LED: First Connection”
[…] From API to LED: First Connection […]
[…] The LEDs will be light up depending on the one-hour price change of a single cryptocurrency – Ethereum – with information fed from the API of coinmarketcap.com (as described here). […]
[…] properly interpreted, as well as actually linking the value to the API – an extension of the previously written p5 code – likely to be converted to JavaScript for the […]