Sure, playing video games is fun, but what if we could have even more fun with it?
I’m using MaxMSP/Jitter to modify the output of the Nintendo Switch. More specifically, I’m messing with the video output of the console while playing Super Smash Bros. Ultimate.
The goal of this project is to modify the video output in fun ways á la data moshing and audio-visual feedback.
Check out the most recent smosh videos on Instagram.
So far I’ve created a system for capturing the switch video, applying audio/visual effects, and controlling those effects from a computer as well as any device with OSC set up.
Post Contents
Overview
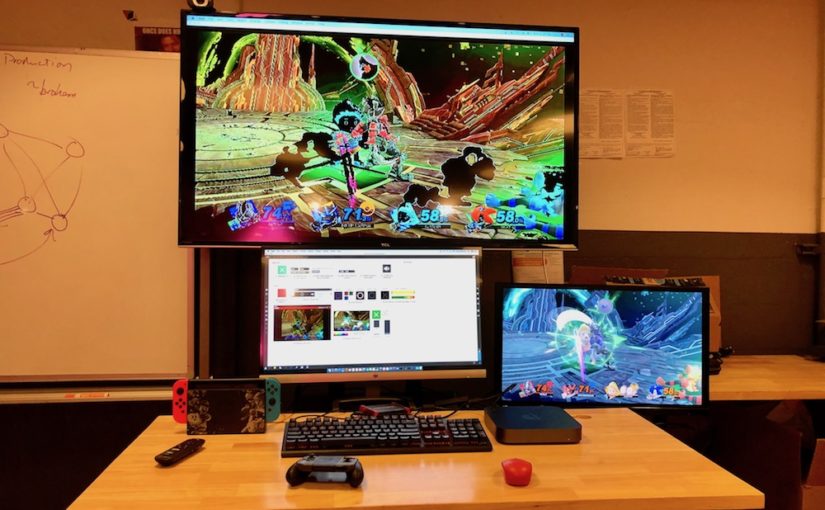
Overall, the setup looks like this:
Holy snarks, that’s crazy – what’s going on here? Here’s a diagram that may help:

The large TV shows the output signal with the video effects, while the smaller screen on the right shows the original signal from the Nintendo Switch console.

The third screen (on the bottom left) is showing the interface used to control the output on the big screen.
Interface
While your friends are playing Smash, The Max/MSP interface for controlling all of this looks like this:

The interface has two sections split between **SETUP** (jump to setup overview) and **LIVE CONTROL**. Within the live control section are controls for recording output to your computer, audio playback, and video effects.
Effects
Plane Mixer
Switches the color planes (Red, Green, Blue) of the incoming video.
This is one of the effects I used in my Big Dark Age performance. You can switch through the planes one-at-a-time or use the “Color Uzi” effect shown above.

I got this effect from the 3a_matrix_plane_techniques patch in this repository folder by Matt Romein. Download the patch for more about how it works.
Audio-reactive Plane Switch
The “Plane Switch” effect can be triggered automatically through a very brutish beat detector.
The beat detector sends a bang to the plane switcher whenever the music being played exceeds a certain decibel (dB) level.

Like I said, this system is very basic and I’m currently working on more advanced audio-reactive tools and hooking them up to other effects.
Chroma Gate / Keyout
Cancel out a specific color (chroma) from the video feed.
In this short example, the darkest colors start as cancelled out; then the tolerance of the chroma-keyout is reduced so more colors return.
Both the tolerance (how much to key out) and the fade (how close the color matching should be) can be controlled:

I also got the components of this effect from Matt Romein’s LIPP 2018 repository: 3_jit_lumakey_chromakey in this folder.
Rainbow Mode
Create a crazy rainbow lag effect:
This effect is super disorienting, but very cool looking. It uses jit.alphablend to create random masks of a single color plane over the existing output.

Surprise surprise this effect is also sourced from Matt Romein’s LIPP 18 repository – 4_jit_alphablend of this folder.
Annoying Ball (WIP)
A user-controlled ball that’s just annoying for now.
This effect takes advantage of the jit.world object in combination with OSC. More details once it does something more useful 😂
Collaborative VJing with OSC
…OK, so now some people can play Smash while one person DJs and modifies the output. What about multiple people controlling the output?
Enter OSC.

OSC (Open Sound Control) is a way to control the video output through wireless communication. In other words, instead of controlling the output through the computer, you can use a wireless device (e.g. iPad, mobile phone) to control the same thing.
This means that multiple people can mess with the switch output at the same time! 🎉 Three cheers for collaborative VJing!
I use the awesome Touch OSC app for this. While I normally hate paying for things, the iOS app is affordable at $5 – This includes both the iPhone and iPad versions.

Touch OSC is especially awesome because you can create your own interfaces using the Touch OSC Editor:


Stay tuned for more updates as I progress with this project! Any and all feedback is welcome, contact me here.
Using Smosh Ultimate
If you want to try this out for yourself, you can start with project’s Max patches from this GitHub folder. The current best file to use is the smosh-world-3.3.maxpat file.
Setup
If you put the patch in presentation mode, you will see a nice little setup section at the top:

After completing all the steps in setup, you should already be seeing video and output in the VIEWR module and floating smosh window.
Sound Control
The output sound is controlled with this section of the interface:

Recording the Current Output
This section also contains the recording toggle, which will write the output you see in the VIEWR and sound you hear to a file (this is how I record all of the samples you see in this post)

By the way, you can change this codec in-between recording.
Effects Control
Use the effect controls detailed above to control the video output.
Setup OSC Control
Will update this section soon. For now, here’s a screenshot of the patch section controlling OSC:

Previous Iterations:
First iteration (handsfree-with-sound patch in the repo)

Second iteration with more video effects (smosh-world patch in the repo):

In this iteration I modified the patcher to use the beloved-by-community jit.world object in an attempt to reduce lag and create an opportunity to use shaders & graphics-intensive video effects.
Before using jit.world I couldn’t make the output jit.window both large AND realtime, so I was only using two monitors and reviewing the output in that small pwindow at the very top.
Even with jit.world, however, the modulated output is not very high-res, though it is real (or near-real) time and I had fun playing with the live effects running on their own.
I think this issue may be due to the video capture card I am using, or how I am getting the signal into Max specifically.
Third iteration with more effects (rainbow mode, annoying ball), OSC compatibility, the option to use live or recorded video, and more resilient setup parameters:

Now that the project is getting somewhere, I also spent some time making the patch more flexible so that anyone can get started with it. This included:
- Providing the option to use recorded video instead of live video (and toggle between the two)
- Providing drag-and-drop areas for the file path of video recordings and music playlists
- Lots of under-the-hood re-wiring and neurotic object (re)arrangement in the patching mode view – I do it for you, people! 💜
Credit where credit is due
None of this would be possible without the resources available on the web and through my education. Specifically:
- A million times over Matt Romein who taught me in Live Image Processing & Performance. You can find some resources and tutorials here.
- Jeremy Sykes for feedback & support of this particular project’s approach & hardware.
- MH Rahmini for play-testing & feedback
Other resources that helped me and may help you:
- https://cycling74.com/tutorials/best-practices-in-jitter-part-1
- https://cycling74.com/forums/the-max-8-jitter-bakers-dozen-1
- https://cycling74.com/forums/realtime-hdmi-input-from-camera
- https://docs.cycling74.com/max5/tutorials/msp-tut/mspchapter16.html
- https://cycling74.com/forums/tap-tempo-2/
- http://www.sharesynth.com/tag/tutorial/
- https://www.highgroundgaming.com/best-capture-cards/
- https://www.mitpressjournals.org/doi/abs/10.1162/comj.2008.32.3.87

